Thursday, December 29, 2011

She's getting married!!

I have SSOOO many ideas in my head that I feel I'm either going to A. POP, or B. forget everything and cry when I try to remember that super awesome idea I had, but can no longer remember.

I am a bridesmaid, along with my other sister-in-law, Catrina, and Shalane's fiance's oldest daughter, Brielle. We finally found our Bridesmaid dresses!
Aren't they awesome? I just love the silky rosette accent :)

I had a really cute idea for tutu's for all the flower girls (there are 6 of them!) and was so excited to make them, but the bride took over the project, and I'm so excited to see how they turn out and how adorable my daughters and nieces will be on the big day.

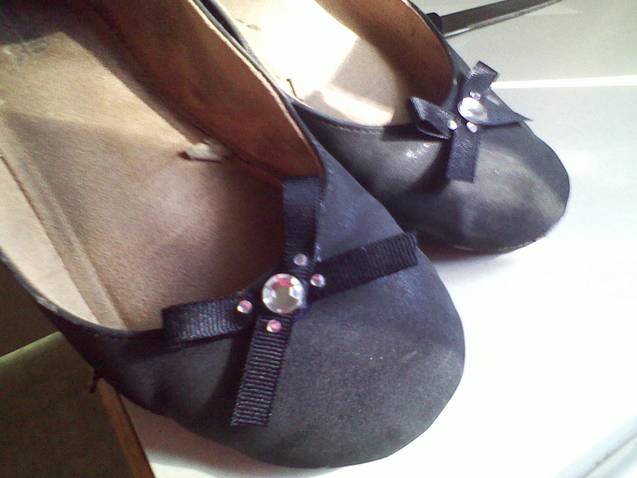
My next idea is cute little ballet slippers for all of them. So I want to take those cheap, solid color slippers from Walmart and turn them into ballet style slippers by sewing shiney ribbons into the back of the shoe where the slipper material meets the bottom of the slipper with enough excess that it can be tied up around their calf to mimic how a ballet shoe looks. I also thought that adding some kind of cute big flower to the top of the toe area would be way cute. I'm going to make a pair and if I get the bride's approval, I'll post a tutorial.

I'm also taking on what I'm calling Project Veil. I cannot tell you how many idea I have for the veil and the bride's hair!! I can't wait to get Cat over to my house so I can have someone to practice on. Think feathers, gems, cascades of white netting, and a touch of pink and orange ribbon with white roses. It's pretty in my head, but probably sounds a bit goddy on paper. No need to fear tho! It will be perfect :)

And for the centerpiece's of the tables at the reception I found this:
and the bride found this:

and together they are going to make one super cute centerpiece! Seriously guys, Google has become my BEST FRIEND lately just trying to find wedding ideas and looking for pictures of ideas that I have. (I'm not very good at explaining things, as you can probably already tell...)

So keep checking back for all the fun wedding idea updates. I'll be keeping everyone posted :)

Monday, December 19, 2011

Rag Rolls!!

Need a new way to curl your little ones hair that doesn't have her screaming at the thought of getting burned or having to stand still for a half hour? I sure did!

Rag rolls. Perfect solution.
Took about

My mom asked me the other day if I remembered a girl who used to baby sit me all the time when I was little, and did rag rolls in my hair before my parents came home so it would be curly the next day.

I didn't, otherwise this would NOT be something I am just now blogging about. So I decided to try it out on my daughter's hair since she has her Cmas program tomorrow for school and there will be no time in the morning to do it with the iron.

Success! My two year old even asked me to do it to her! This is how they look. Reminds me of the good ol' days :)


I thought you guys might like a how to video because in my excitement after my mom's comment, I didn't wait to make one so I surfed Youtube and found this one that I liked. This lady doesn't call them rag rolls, but they're basically the same thing.


I did mine the exact same way she did in this video which is why I chose this one. Some people do them differently like with bobby pins or sponge rollers, but this was what I thought would be most comfortable for my girls to sleep in so that's how I did it. Apparently I'm not alone in those thoughts :)

This is how mine turned out.


Ah, my little curly haired beauties :)

Thursday, November 17, 2011

I LOVE Fall colors!

I made this hair clip yesterday and I was so excited to be wearing brown today so I could try it out. It's 3 flowers on one clip and I just love the light brown and orange. Sorry about my hair, I had all of a single minute to throw it up this morning. Anyway, I just wanted to share because I love the clip and especially the colors.


I may not get a chance to post again before Thanksgiving because my baby is sick, so just in case, Happy Thanksgiving to all my readers! I hope you all have an amazing and delicious day!

Sunday, November 13, 2011

Pomander Tutorial

While I was surfing google and crafting blogs this morning (like any other Sunday afternoon) I found this. How cute are these? I just love them! I can't wait to make a couple and hang them up in my daughter's room. They will both just love them. And they're not hard to make either! I absolutely love finding tutorials for all the creative stuff people out there are designing. It's so much fun!


Credit goes to the writer of the Betz White Blog. Click here for the address and the tutorial and have fun crafting and creating!

Saturday, November 12, 2011

Fancy Lace Earring Holder

The original idea for this belongs to my bother-in-law, Jeremy, who made one of these for his wife out of a strip of material and a hanger to go in their closet. My mother-in-law then made a more durable version for my sister-in-law, after which Jeremy made three of the same for his wife. And then there's my version.


Pretty fancy huh?

Friday, November 4, 2011

Newest Hair Clips

Here are some of my latest Hair clips. I'm sharing a new idea next week for something really cute so stay tuned for those clips as well! Enjoy :)

Small and simple

Fall and glimmer

blue :)

new and shiny, but I like it

Rags to Riches, so to speak


Want to add a little "somethin somethin" to an old pair of jeans? So did I. So I did. Using the glue and jewels pictured above, (both purchased at Michael's Arts and Crafts Store, not expensive.) I added jewel accents to an old pair of jeans I had.

What do ya'll think? It was really easy, just follow the pictures. Using small dots of glue where you want to place the jewels (I chose along the decorative seam, you can choose where ever you want) and immediately after laying a small row of dots, place the jewels on top. Let it dry for a whole day before you wear them and wait a week to wash them. I've already washed mine and the jewels are all still there.

Adding Cuteness to Plain Ballet Flats

So I've had these plain black ballet flats for over a year now and I should have done this a LONG time ago, but I just never got around to it till last week. I decided that they were boring so they needed a little something extra. Here's what I did :)

*Pardon the dirty soles...
With just a little black ribbon and a few self stick rhinestones I added quite a bit to these used-to-be-boring shoes.

Happy Friday!

Wednesday, September 21, 2011

Cute, Easy Craft: Pet Rock

My daughter and I went up to Timpanogos Lodge for her second field trip yesterday. It was a BEAUTIFUL day up the canyon. It was time to go by the time our group got to the "Pet Rock" making station, so I told her to grab a couple arms and some eyes so we would make one at home. I'm really glad we did because it turned out WAY cuter than the ones that they were doing. We had something special: PAINT and BEADS. Imagine that. haha

Anywho, I'll probably end up running to the Dollar Tree later today to buy a package of eyes and a package of pip cleaners so my youngest can make a Pet Rock, too. This is fun and EASY craft to do with your kids on the weekend or something or with those restless kindergarteners who you can't seem to entertain without the TV until it's time to go pick up your older kids. (Or till it's time to make dinner when Daddy gets home because you have no older kids yet)


All you need for this craft is:
-1 rock, any shape/size
-2 pipe cleaners, any color
-2 eyes, big or small
-Some acrylic craft paint and a sponge or brush to paint with
-Hot glue gun and hot glue
-Hair dryer on low heat and low power
-a toothpick (optional)
-a single bead, any color/shape (optional)
*Dollar Tree and Family Dollar sell packs of multi-size eyes and multi-color pipe cleaners for a buck each! Can't get any better than that!


-First, you paint your rock. Let your kiddos get creative. My daughter's rock is pretty plain, but she insisted on only having purple and no other colors. After they are all painted you can use the blow dryer to speed up the drying process.
-Once you can touch all sides of the rock with dry fingers and get no paint on your fingers, you're ready to move on. So go ahead and use your hot glue gun to glue the eyes on whatever rock face you want.
-Next come the arms. To make the swirls like in the picture you just hold the pip cleaner in between 2 fingers and wrap the remaining part around on of your fingers. Then slowly pull it off and VwaLa! Curly arms. Or you can do straight arms, or zig zags or whatever. Then just straighten part of one end out and glue it towards the back of the bottom. Do the same to the other and glue it towards the front of the bottom. This will help the rock from teetering and being unsteady when still on a hard surface.
-Next, if you wish, take the bead and glue it in between the eyes on the bottom side of the eyes. Then finish it off by using your tooth pick to paint your child's name/initial(s) on the back side of the rock.


Aren't they cute? It's pretty self-explanitory, I probably didn't even need to include instructions, but I needed the typing practice. haha Enjoy :)

Saturday, September 10, 2011

Finding Buried Treasure

So I'm a big thrift/second-hand store shopper and I just love it when you find something that makes you think "Who would want to give that away?" I call it 'finding buried treasure'. I wanted to share some of my latest finds, including my favorite that I actually bought a while ago, but just put up in my room last night.

^This little white board/picture frame gem only cost $3.00! It went up in my hallway.^

^This calendar board only cost $4! It's in my bedroom.^
________________________________

This is my most recent decorating project, the one I hung last night. I bought these at D.I. a few months ago and hadn't figured out what I wanted to do with them until last week.
So I tried taking the mirrors out and only managed one (big pain in the rear) and ended up covering the rest with painters tape, and spray painted them with a medium gloss black paint.
Then I put hooks and red ribbon on them and hung them on my wall! Eventually I want to center a shelf under the middle one and put some cute glass tea candle holders on it. (which I also found for .25 at a thrift store too :)
Turned out cute, huh?

Friday, July 29, 2011

Do-it-yourself Decorative Cork Board

I don't have any NEW projects today, but I did want to share some pictures of a project I did last year that I just got out of storage yesterday and am trying to find a place to hang. You've all seen those decorative cork boards with them ribbon on them so you don't have to put any more pins in it? You just slip it through the ribbon. Well, I made one of those early last year for my daughters room and was really pleased with the way it turned out. It took a while and was pretty tedious, but over all it turned out great.


*All I used was a big bulliten board (purchased at walmart about for $12)
*Some shiny pink material, trimmed to size and pushed under the edges of the board with a credit card
*White, pink, green, blue, and purple craft paint for the outside (paint it first and let it dry before doing the rest)
*Small and Medium Round Paint brush sponges
*Plain white ribbon, cut to size and pinned in place
*Plain white thumb tacks

The rest is pretty self-explanitory so you can figure it by yourself. It's easy to figure out, it just takes a while to put together.

Enjoy!

Weekends don't count unless you spend them doing something completely pointless.
~Bill Watterson

Saturday, July 23, 2011

Wooden Open Lockers

I follow one of the coolest blogs called Organize and Decorate Everything. They're always got great ideas over there for keeping your house neat and looking great. Her most recent blog post was about her favorite ideas from a link party she hosted last week.

I absolutely loved one of the ideas, originally from Holly at Bits of Everything, called Mud Room Lockers. I would use this in my entry way or wherever the kids came in from school as a cute way to keep their school shoes, bags, jackets, lunch boxes, ect. organized when they came home from school. Aren't these just awesome looking? What a great idea.

I love blogging because you come across so many amazing blogs by people who have the greatest crafts and ideas to share with you to help make your life more fun and easy.

Aren't these great? They'd be great in any room in the house actually :) Have a happy Saturday everyone!

Monday, July 18, 2011

Hair Stuff

I've been really into making hair accessories for my kiddos lately. I just wanted to share a few of my latest (I'm not very good at it yet) pictures. They're actually really easy to make. I can't wait to get more materials on the 25th because Roberts is have a half off everything sale in honor of Pioneer day, it's very big in Utah... I have so many ideas I want to try out. You'll be seeing more of that in the near future for sure, some fabric, some not :)


Saturday, July 16, 2011

Fabric Flower Hair Clips

I follow a lot of crafting blogs and sites because I always love to see the fun new things that moms and others are coming up with to keep things fresh and new. I also like to try a lot of them when I can afford it. This one is one I found a long time ago and have wanted to try for quite some time, but never had the materials I needed. Well, now I do! I'd actually love to get some new material because Roberts Arts and Crafts Store is having a 50% off your entire purchase sale for the celebration of Pioneer Day. (It's big in Utah) Woot Woot! Anywho, I found this craft on my friend's blog, who found it on a very cool crafting site, you can find her blog and the link for the crafting site here.

So here's my spin on the fabric flower hair clips. I promise they'll get more "flower-y" in time. haha This was my first youtube how to video so hopefully it won't look too bad, but you can see all my flowers on here. I hope you like it :)

Monday, June 13, 2011

GACK!!

I happened to marry into one of those families where everyone is good at everything, and everyone is so incredibly creative. I love it! I've learned so much from all my in-laws and one of the funnest things I've learned (from my oldest sister-in-law, Shannon, who is very creative) is a sort of slimy craft that my children just love to play with. It's called Gack, yes you read that right, Gack! I would like to share that with you today.

^This is the Gack!^

All you need is:
a small bowl
a large mixing bowl
6 drops any color food coloring
2 cups water
1 teaspoon Borax (a mild detergent, you can get it anywhere)
2 cups (4 bottles) of Washable Elmer's White School Glue


In the smaller bowl combine Borax with 1/2 cup of the water and stir till dissolved.
In the larger bowl stir the glue, the rest of the water, and the food coloring together and mix till well combined.
Once the glue and the water are all mixed together, Add the borax/water mixture.
Knead together with hands till it is no longer sticky.
Store in an airtight container.

^My youngest didn't quite know how she felt about this stuff lol^


This is a great indoor craft to do with your kids while they are out of school to keep their imaginations fresh and it also makes a great science experiment! It's completely solid, but it melts when it sits untouched for too long into sort of a solid liquid hybrid.
Enjoy!!!!

Monday, June 6, 2011

Homemade Jack Daniels Hookah

Never in my life did I think he would be able to make this work! My hubby can be so creative when he wants to be. No money spent, he made a Hookah out of an old Jack Daniels bottle, a few old spare hookah parts from a broken pipe, and some junk he found in a tool box from our shed. The thing that amazes me most is that it works!! I just had to share some pictures of his hard work. Enjoy.


No scolding allowed dear mother-in-law. (Hehe, love you:)

Saturday, June 4, 2011

The French Braid

Let me just start this by saying that I love my mother. She is one of the kindest, loving, most generous people you will ever meet. That being said, she's always been kind of lacking in the "girlie things" department, so growing up I never learned how to do make up properly, how to French braid, or how to properly coordinate outfits of any nature. I've pretty much been self taught on most of these things and my newest thing to learn has been the French braid.

I tried it on my own hair first (after watching several "how to french braid" videos on Youtube) and it just looked funny, so I started over and it fell out before I could get the elastic in. Not really that great.

So I made my daughter sit down so I could practice on her and it looked a TON better, but was falling out by the end of the day so needless to say, I need lots more practice. But I'll get it down eventually.